
Break Git Down: How To Create a Branch From Master and Make Your First Commit!

Introducing the Break Git Down Series!
Break Git Down is a super beginner-friendly series to help newer developers learn a few of the most important Git tasks that you will certainly use. Git is an essential part of every day life as a developer and my goal is to help make the transition to using Git (and ultimately the command line), a smooth and hopefully easy learning curve.
Why Learn it?
Git was one of the things I was scared of when I was learning how to code- mostly due to my irrational fear of the command line. Instead, I used GitHub Desktop which allowed me to lazily drag and drop files. However when I was hired in my first tech role, I soon realized how essential it was to be acquainted with using Git in the terminal. It’s an essential part of our everyday lives as developer to use it!
For sake of brevity, we’re going to assume you are working in an existing repository (aka project that already has a Master branch)

Why Would I Create a Branch Separate From the Master Branch?
To put it in the simplest way, the Master branch contains all of the official code for a project (aka repository). In a typical workplace, we would NEVER directly push code directly to master as a way to reduce the chance of shipping bugs and unnecessary code to production (aka live site). Instead, the safest thing to do is to create additional branches that are separate from the Master branch. Think of them as different versions of your project.
Now Let’s Get to Pushing!

Let’s see what branch we are currently in! When we run git branch, it will display all of the branches that are associated with the repository.
The branch that is highlighted indicates where in the repository we are currently located.
Next, we will change our location to the master branch so we can be able to start off fresh when we create our new branch! (If you’re already in the Master branch, perfect!)
git branch
git checkout master
Let’s create a new branch. In this tutorial, we’ll call it “newer-branch”
Git checkout -b “newer-branch”
Now we’ve created a new branch so that means whatever change we make (ie creating a file or editing an existing one), will only affect this branch! This is great because we are keeping our code organized and we reduce the risk of messing up the whole project lol.
So make any changes that you want to the new file. In this instance, I updated the README file.

Next we will add the file to our commit. Choose one of two commands.
The first command will add all files to the commit. You would usually only do this if you have made changes to every file or if there is only one file in the repo.
git add .
Option #2 (The one we will do in this tutorial) will only add the file that you specify that you want to commit! You will have to specify the relative path of the file you want to commit. In this case, it will be the README file.
git add README.md
Next, let’s add a detailed description of what we’ve changed in our commit. -m simply stands for message.
git commit -m “add a detailed description”
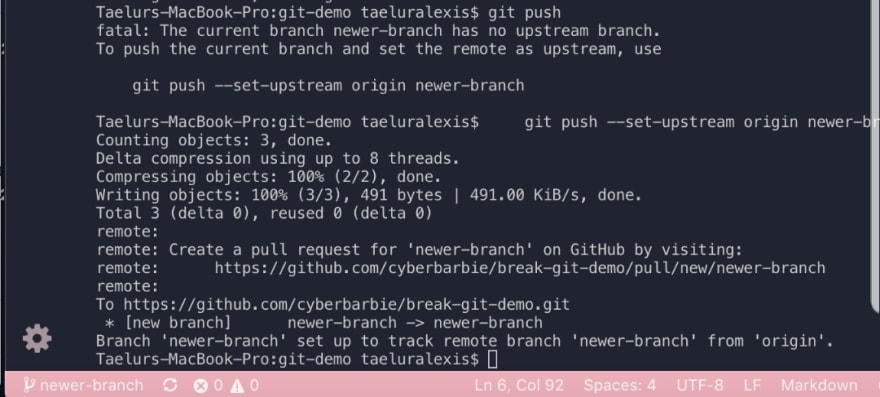
The git push command allows you to send the commits from your local branch in your local Git repository to the remote repository and it will provide us the exact command we need to push our beautifully new branch to our Git repository! (my favourite command). Later on, we’ll be able to merge our “newer-branch” commit to our master branch.
git push
git push –set-upstream origin newer-branch
Now, let’s check our GitHub!

A helpful reminder I’ll always advise throughout the series is to practice, practice, practice! You’ll learn through repetition. I hope you’ve enjoyed the first part of the Break Git Down Series. Stay tuned for more!
This blog is amazing! I’m glad I saw this today on LinkedIn because I also was thinking about starting my own blog online